Canon 50mm f/1.4, Canon 5D, ISO 100, f/1.4, 1/2000 sec
This is a guide for people who have made the jump to cameras that offer manual control. If you're new to all of this... It would be best to read this review 1 section at a time, and spend a couple days practicing that technique, since this will be quite a bit of information.
I'll be jacking videos from Youtube since I'm lazy, boo hoo.
To follow this guide better, have your camera with you. Like... right infront of you.
-Exposure briefly.

Example of an underexposed, well exposed, and overexposed picture
In your camera, there are only a few things that you can control:
ISO, Shutter speed, Aperture.
In your point and shoot, your camera takes care of all of these things for you. Camera companies think the masses are too dull to set these for themselves, prove them wrong. Please... prove them wrong. Take charge of your pictures.
All 3 are responsible for letting in or blocking out light. Aperture is works like the iris in your eye, it widens and narrows to let in or block out light. As for shutter speed... every time your camera goes *click* that's the sound of your shutter opening and closing. The long shutter shutter speeds allow more light to come in, shorter shutter speeds prevent light from coming in. ISO is your film's sensitivity to light, a lower ISO is less sensitive to light than a high ISO.
The right balance of these 3 things will lead to a good exposure, let in too much light and your picture will look too bright / white (overexposed). Let in too little light and your picture will be too dark / black (underexposed).
So why do we have all 3 of these things that effect how much light you let in your camera? Why not just have 1 device take care of it all to make things simpler?
Next: ISO, Aperture, and Shutterspeed in depth.
-Camera Modes
In short.. don't use the green square (complete auto mode), or else I'll shoot you... with a camera of course ^_^; This video is done on a Nikon camera, but it applies to every camera.
-ISO
Back in the old days, there were several different companies that produced film, so they needed a way to tell a consumer how sensitive their film was to light. These standards carried over to the digital world, so again, ISO is how sensitive your film is to light.
Tamron 17-50mm f/2.8, Canon 30D, at 17mm, ISO 100, f/11, 1/160 sec
ISO is measured by a number that usually ranges from 100 to 6400. The less the number, the less your sensor(film) is to light. So on a Sunny day, you'll want to use ISO 100.

Canon 28mm f/2.8, Canon 5D, ISO 1000, f/2.8, 1/100 sec.
Indoors or at night You'll probably want to use ISO 800+
However there is a downside to using a higher ISO. Your image will become more "noisy." Noise consists of the artifacts/pixels that show up in your image. (As in the picture above). So try to use a lower ISO when possible.
The following video is pretty good, he tells you what ISO is, and shows you how to change it on a Nikon camera. The way of changing on on any camera should be relatively the same.
ISO does not offer too much as far as creativity goes. You usually will play around with your Aperture and Shutter speed to achieve particular effects. Which leads me to...
-Aperture
Canon 85mm f/1.8, Canon 5D: ISO 200, f/1.8, 1/500 sec.
The aperture in your lens is a lot like the iris in your eye. It opens and closes to let in light. The wider the aperture, the more light is let in. Aperture is measured in "F-Stops" usually you'll see an F, followed by a number usually ranging from 1.4 to 22.
The lower the number, the wider the aperture. Higher the number, the narrower the aperture.
Make it wider to let in more light, make it narrower to block out light.
Other than letting in and out light, the aperture allows you to control something else called "Depth of Field." I think this guy explains it pretty well:
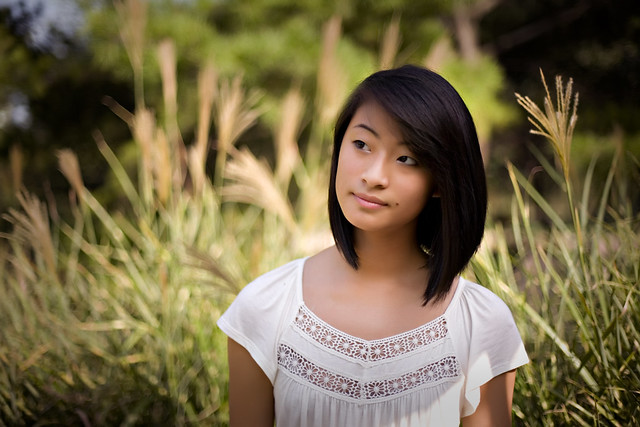
Shallow depth of field is what inspired me to start photography.
Canon 50mm f/1.4, Canon 5D at ISO 1250, f/1.4, 1/60 sec.
I fell in love with blurred backgrounds, and its really as simple as making your F stop as low as it can go. A shallower depth of field can also be obtained by getting closer to your subject, or using a longer lens. You'll notice in some shots that the blur actually makes light become these circular things... and we call that "bokeh." It's quite beautiful isn't it =)?
Shallow depth of field allows you to separate your subject from the background, or it lets you force the viewer to focus on something in your image.
"My lens can't go down that low!" - Well you need to get a different lens ^^; I recommend your respective brand's 50mm f/1.8 lens. Also check out my gear recommendations list

Canon 28mm f/2.8, Canon 5D, ISO 100, f/10, 1/200 sec.
However, sometimes you want everything to be in focus. In this case it's best to use a very narrow aperture, or a high F number. The picture above was taken at f/10.
To get a feel for this:
In a well lit room, place objects, fruit or... water bottles like the guy did in the video. Put your camera in A, Av or Aperture Priority mode. Set your camera's aperture to the lowest it can go. Focus on the middle object, then set your aperture higher by 2~ (perhaps 2 f-stops =P) and take a picture from the same distance, focusing on the same thing... compare. If your lens can only go down to f/4, that is fine, just increase it to 6.3 for the next shot and so on.
Next post: -Shutter Speed
If you have any questions, feel free to ask. Also leave tips and corrections! Thanks!